The computer vision tech that helped 15,000 voters request a ballot online

VoteAmerica’s E-Sign technology
Written by Ben Weissmann (VoteAmerica), and originally published on Medium. Republished here with permission.
Americans don’t need to be convinced to vote. They need to be able to vote. It’s harder to vote in the United States than in any other nation with democratically-elected leadership. We know that voters turn out when you ask them to, and when they have the resources to be able to. But some states have systematically made it hard to register and to request a mail-in ballot (also called an absentee ballot), and it’s no accident that these barriers disproportionally affect low-income voters and voters of color.
Partisan campaigns focus on what are called “high-propensity” voters — people who usually vote. This creates a self-reinforcing system where you have a group of voters that face more barriers getting to the ballot box, and then these voters get classified as “low-propensity” and nobody reaches out to help them.
At VoteAmerica, we break this cycle by identifying these barriers, building tools to remove them, and then proactively reaching out to voters (tens of millions of them in the run-up to the 2020 General Election!) to help them find and use these tools so that everyone can make their voice heard and have their vote counted.
Requesting a ballot
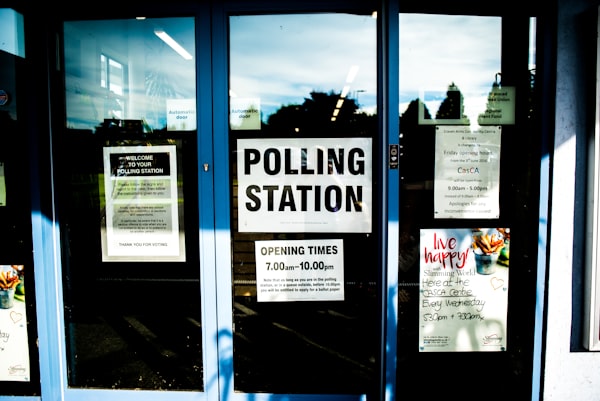
One of these key barriers is being able to request a mail-in ballot. Even in the midst of a pandemic, many states do not have an online system for requesting a ballot. So voters need to find the ballot request form, print it, sign it, and then mail it or hand-deliver it to their election office. And with tens of millions of Americans out of work due to the pandemic, even fewer people have access to a printer: home printer ownership is in the low single digits and has been for years.
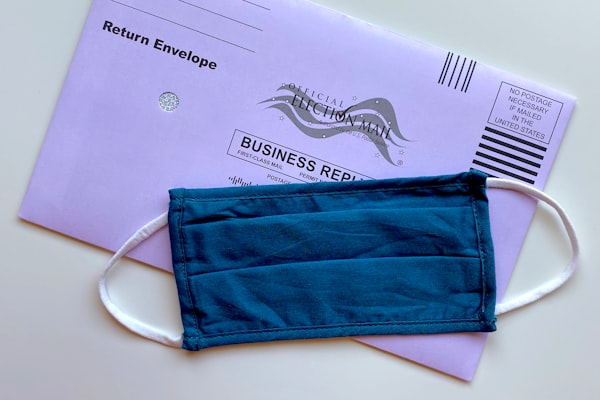
But in about ten states — comprising tens of millions of voters — you’re allowed to submit the ballot request form by email or fax, as long as it still has a “wet” signature (a real pen-on-paper signature that’s been scanned in). But to do that, you’d need to either still have a printer and scanner, or have the technical know-how to use something like Apple Preview to scan in your wet signature and apply it to the application form PDF. And in states that allow fax but not email (New Hampshire and Kentucky), you’d also need access to a fax machine!
So at VoteAmerica, we built an e-signature workflow that let you complete your ballot request form — including a wet, pen-on-paper signature — entirely online, from a web browser on your phone or computer.
The VoteAmerica ballot request workflow
First, the user enters in their basic biographical information. This is used both to fill out the form, and so we can follow up with them later to help them complete and return their ballot once they receive it.
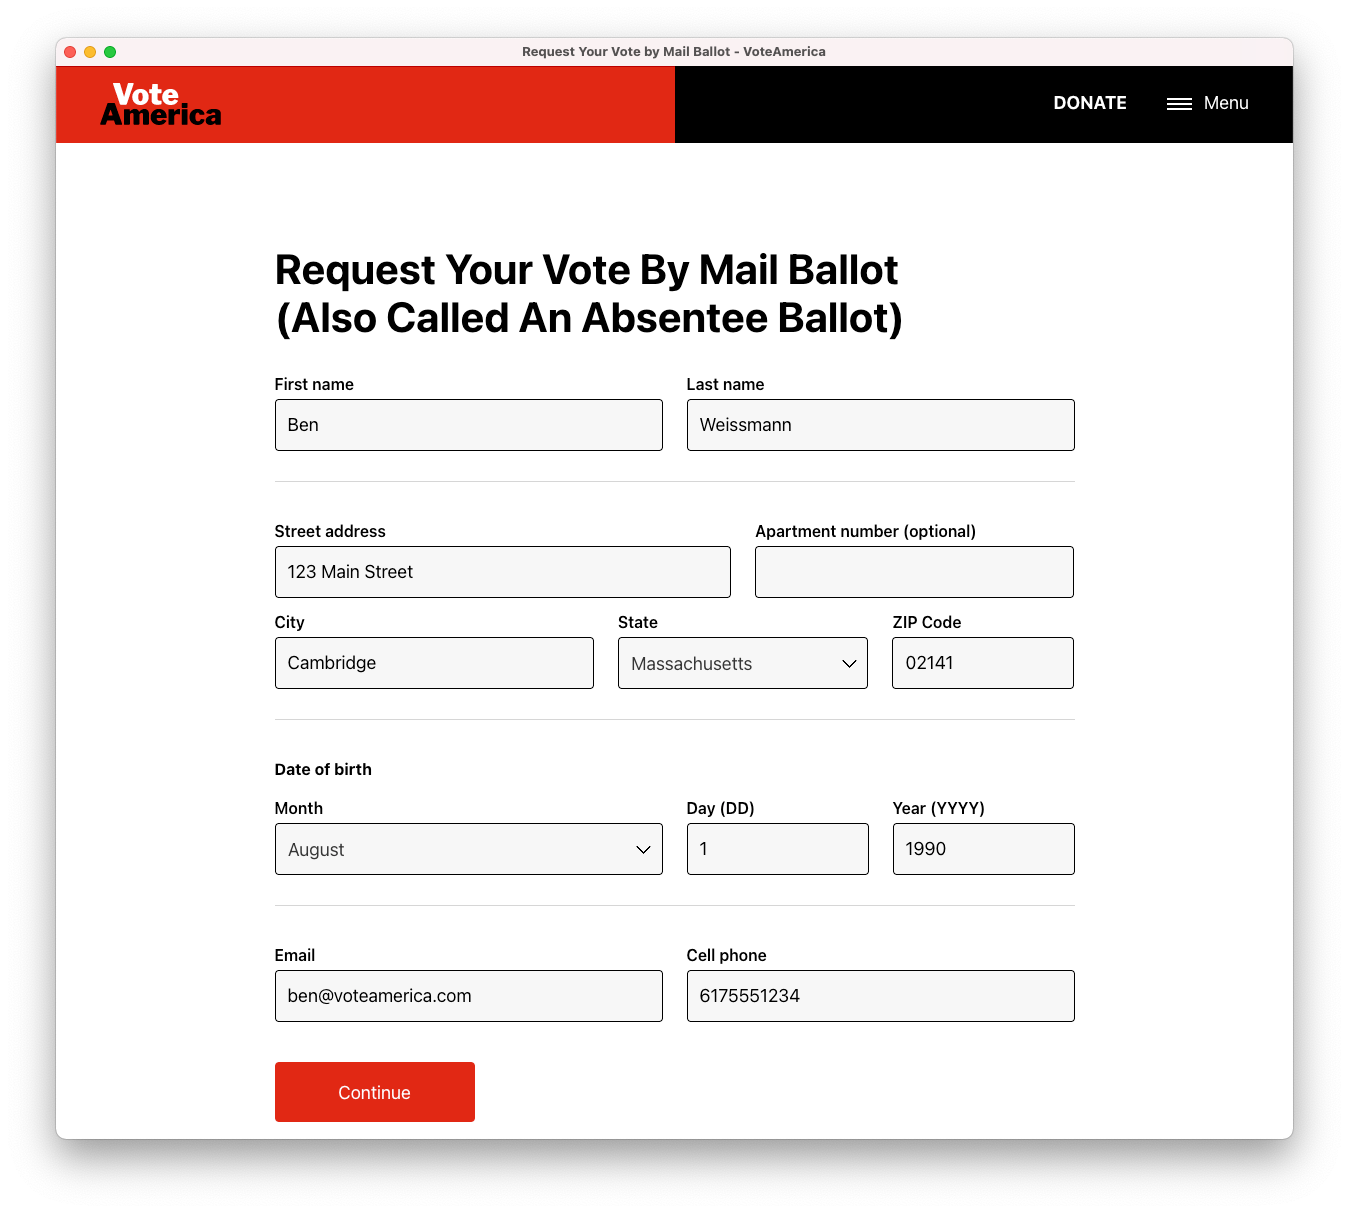
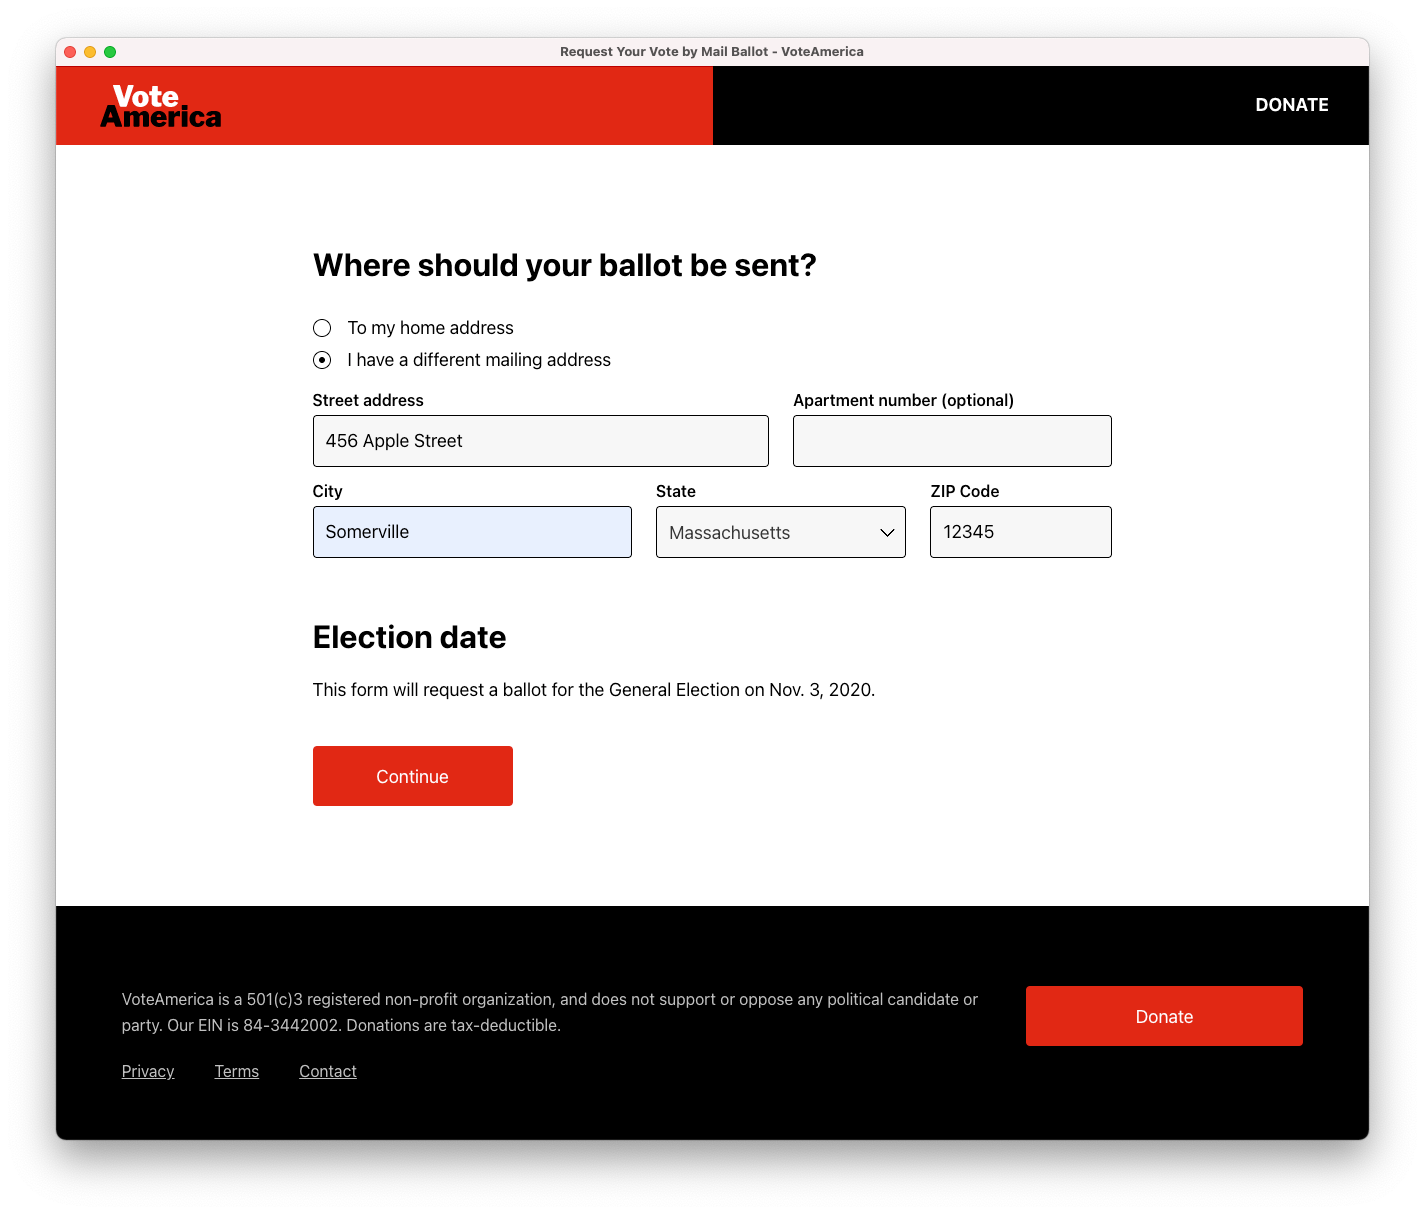
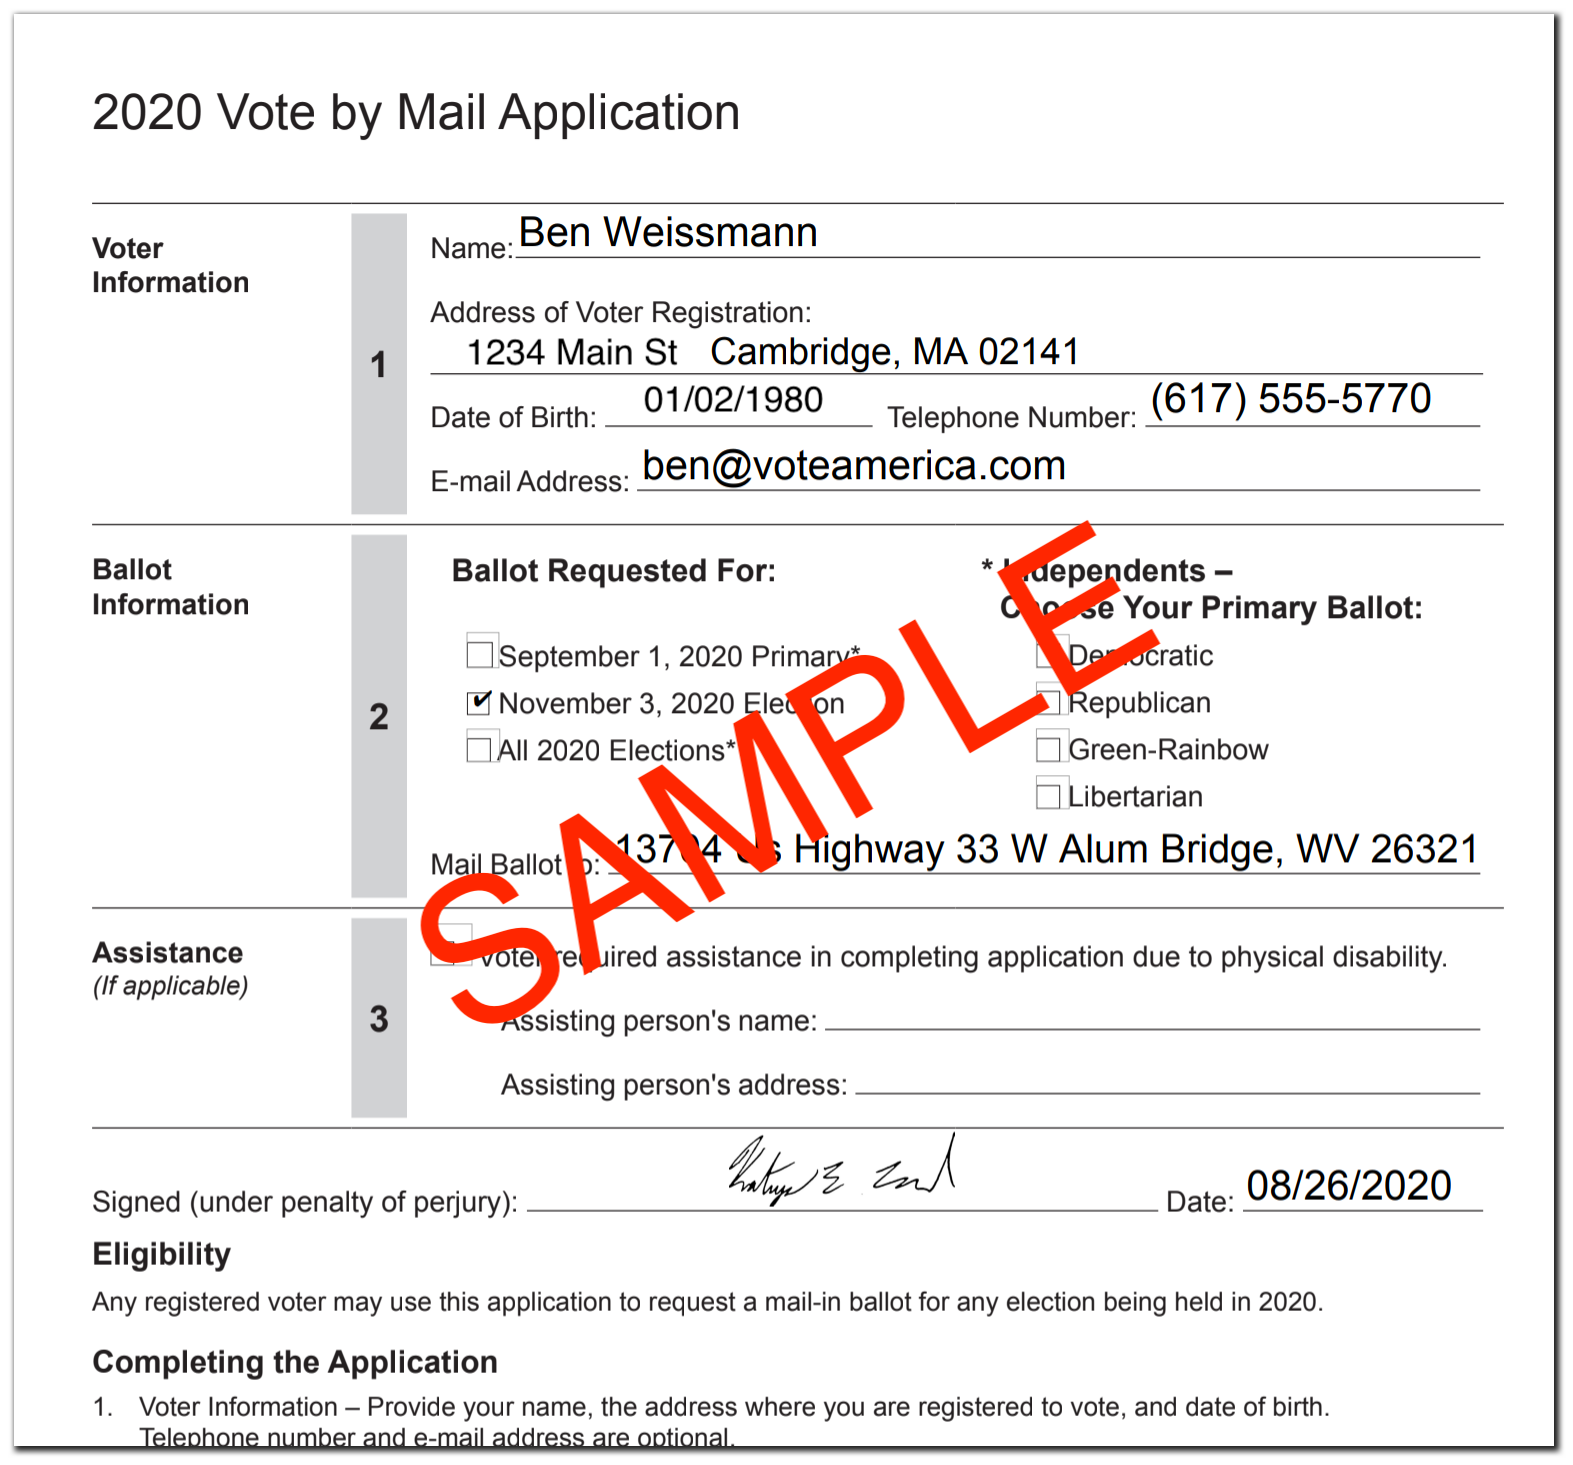
Then, the user enters in a set of state-specific information. Unlike voter registration, where anyone from any state can use the National Voter Registration Application, each state has a different form for requesting a mail-in ballot, each with different fields to fill out and questions to answer (well, that’s not quite true — every state accepts the Federal Post Card Application for overseas and military voters, but no state accepts that form for domestic voters). So we reviewed and digitized all 51 forms — for every state and DC — to build state-specific forms. Massachusetts, for example, keeps it pretty simple:
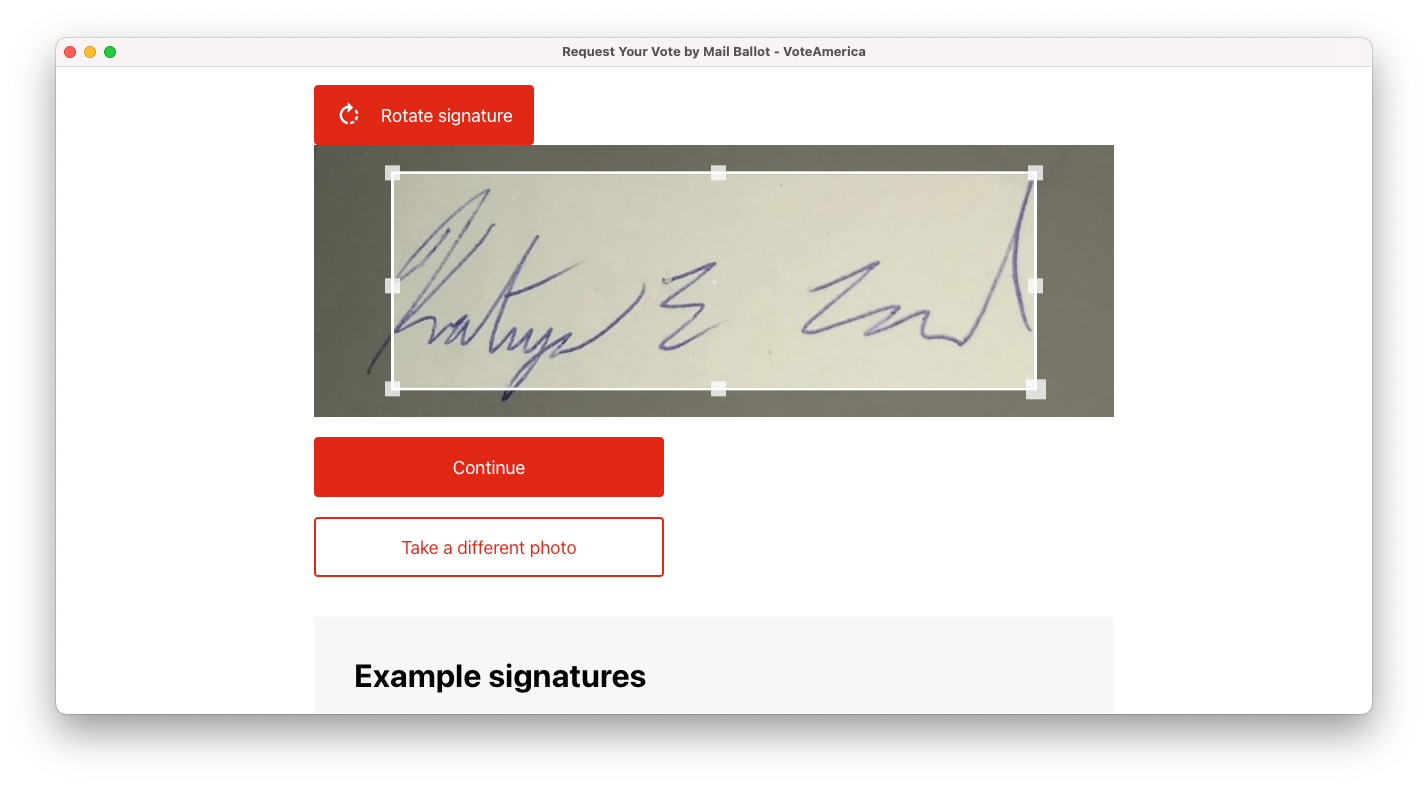
Then, we ask the user to take a picture of their wet, pen-on-paper signature. On mobile, we provide a camera UI right in the page, and on desktop, we let you text the picture to us (we don’t use a camera UI on desktop because it’s a bit awkward to try and hold a paper with your signature up to your webcam without the paper blocking your view of your computer screen).
As soon as the user takes the picture or texts it to us, we show it and provide an opportunity to crop and rotate:
Then, we process the image to extract a clean, black-and-white signature that we can apply to the form:
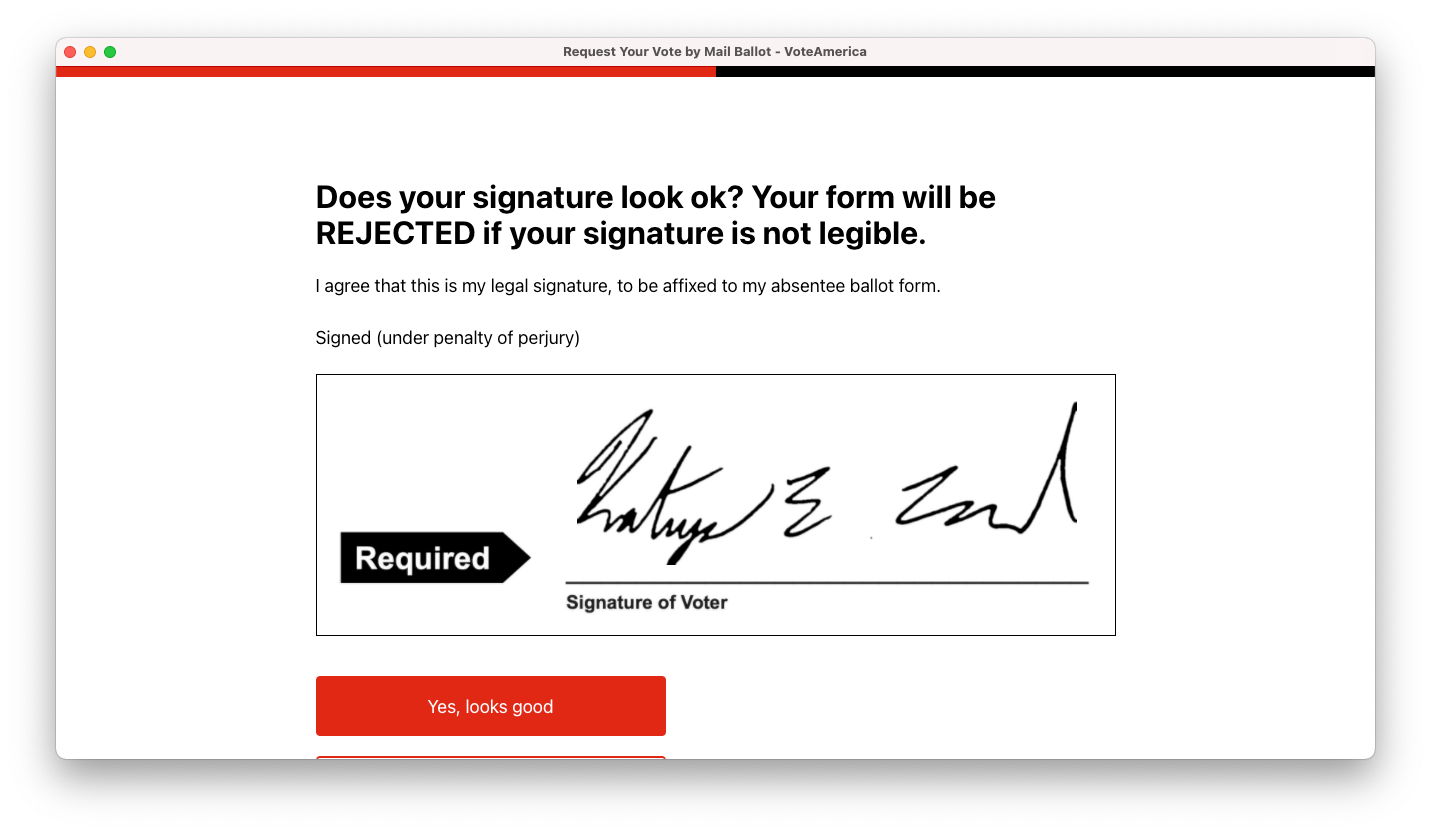
And that’s it! The user has filled out the whole form using our web-based tool. We then send the form directly to the user’s Local Election Office, either via email or fax (depending on the state, and what that state and Local Election Office will accept). The election office gets a nice, clean form like this:
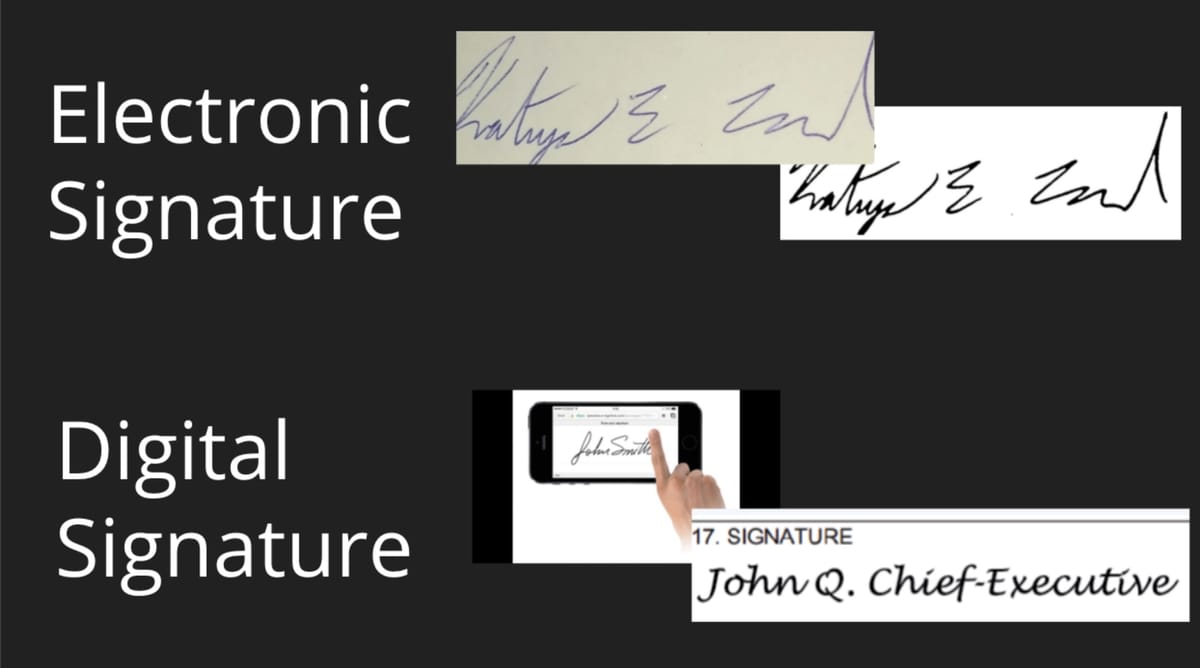
Electronic vs. digital signatures
We’re taking advantage of an important distinction here between an electronic signature and a digital signature. You’ve probably used a digital signature before — it’s a signature that’s never existed in physical form, like your finger on a touchscreen or typing in your name and having a computer show it in a cursive font. Some states, like Massachusetts, do accept digital signatures, but they’re not accepted in most states. So instead, what we’re doing here is an electronic signature: a real pen-on-paper signature that we’re just transmitting via technical means. Think of it like Mike Teavee from Charlie and the Chocolate Factory, who gets transported via television: we’re taking a real, physical signature, and we’re just applying it to the document and sending it electronically.
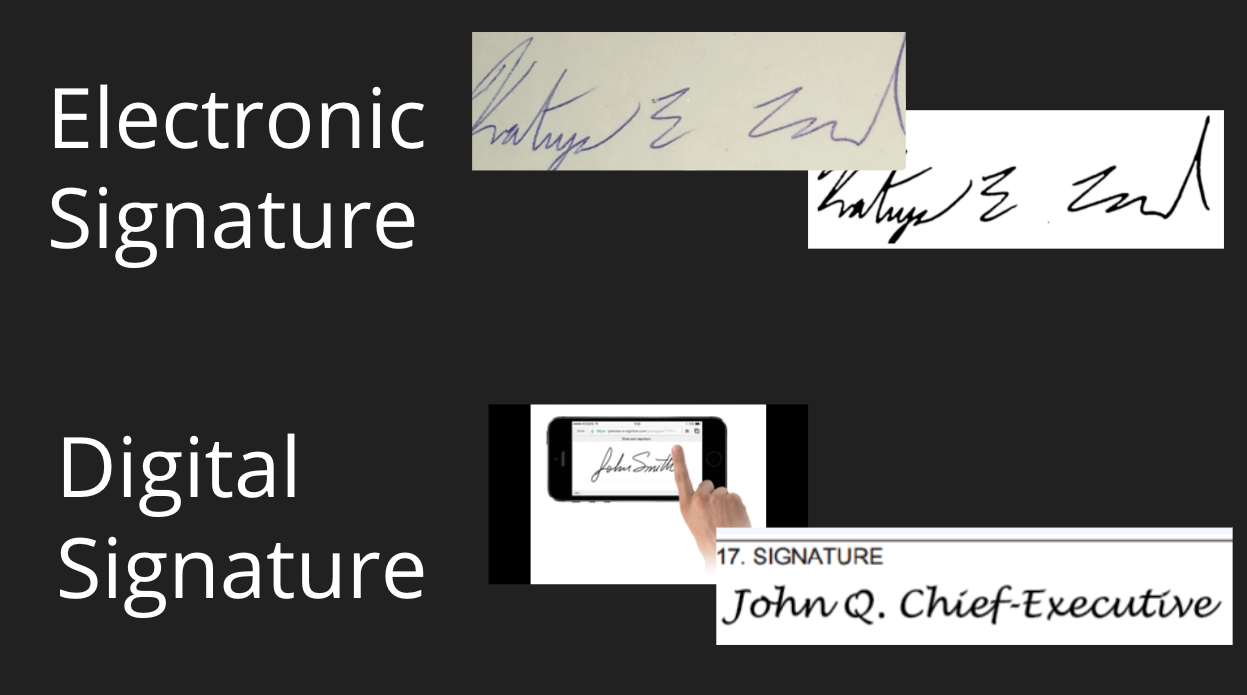
Electronic signatures are valid everywhere: the laws governing them are federal laws enacted to establish that faxed contracts are just as binding as mailed contracts.
Even in states where we could use a digital signature, we use electronic signatures. One of the most common causes for mail-in ballots to be rejected is because the signature on the ballot doesn’t match the one the government has on file from the voter registration or ballot application, and electronic signatures are much more likely to look like the voter’s signature on file than a digital signature.
So where does computer vision come in?
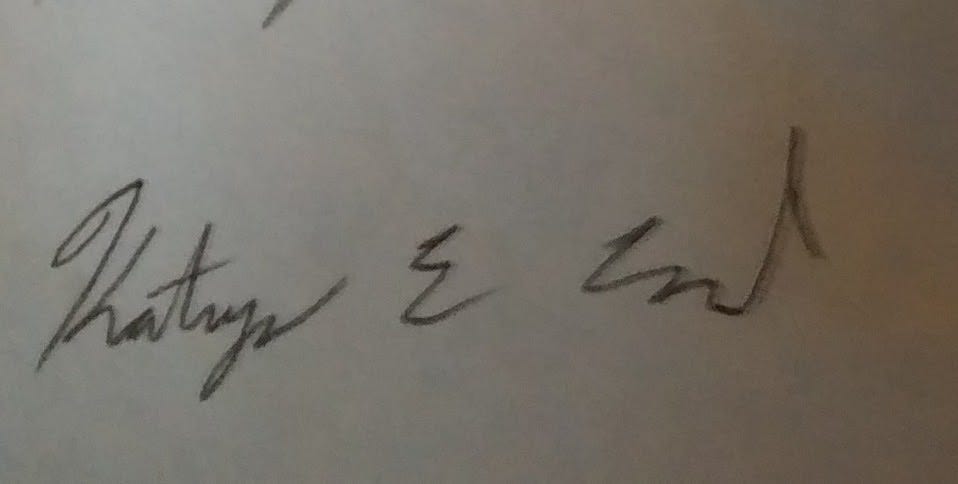
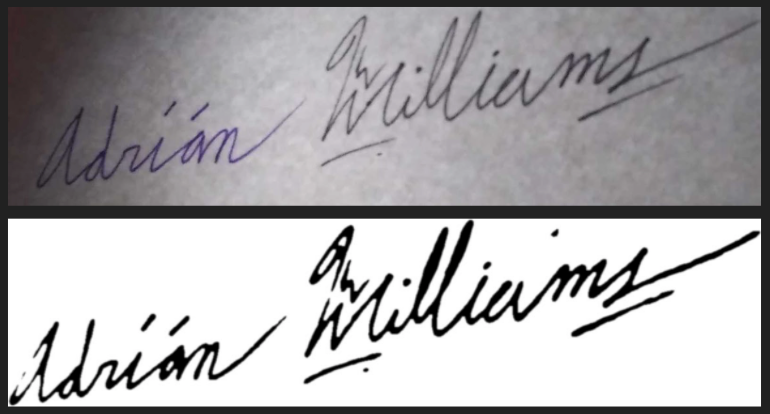
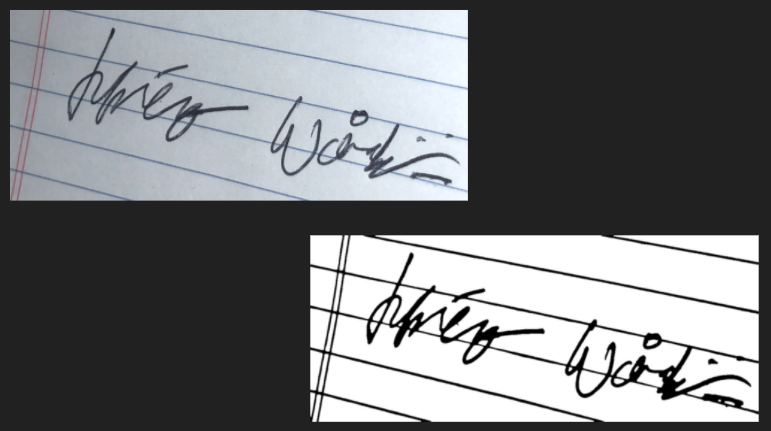
You might have noticed in that walk-through that there’s a pretty interesting step where we go from the signature in the photo to the clean, black-and-white signature:
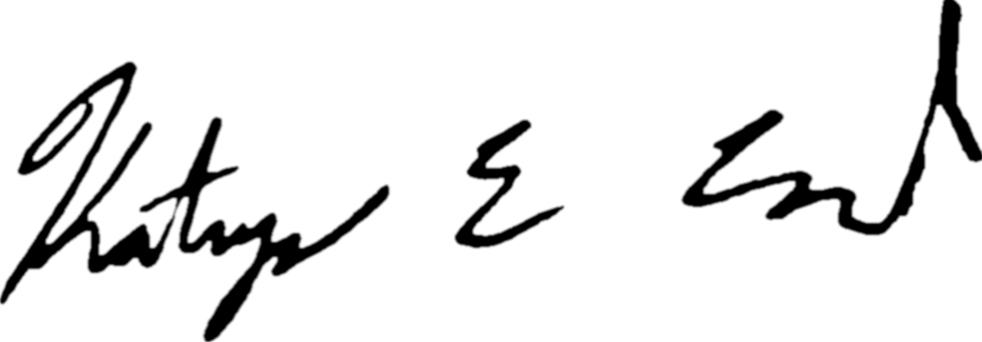
How do we do this? We stitched together a number of image processing and computer vision techniques to reliably extract signatures from user-captured images.
Why is this hard?
If you’re new to the world of image processing and computer vision, you might be wondering what’s so hard about this. After all, when you look at that photo, you immediately see the signature — the human brain has no trouble at all identifying what part of that image is the signature, and what part is the background. Computers, however, have a much harder time figuring that out. To understand why, take a look at this image: which square is lighter: square A or square B?
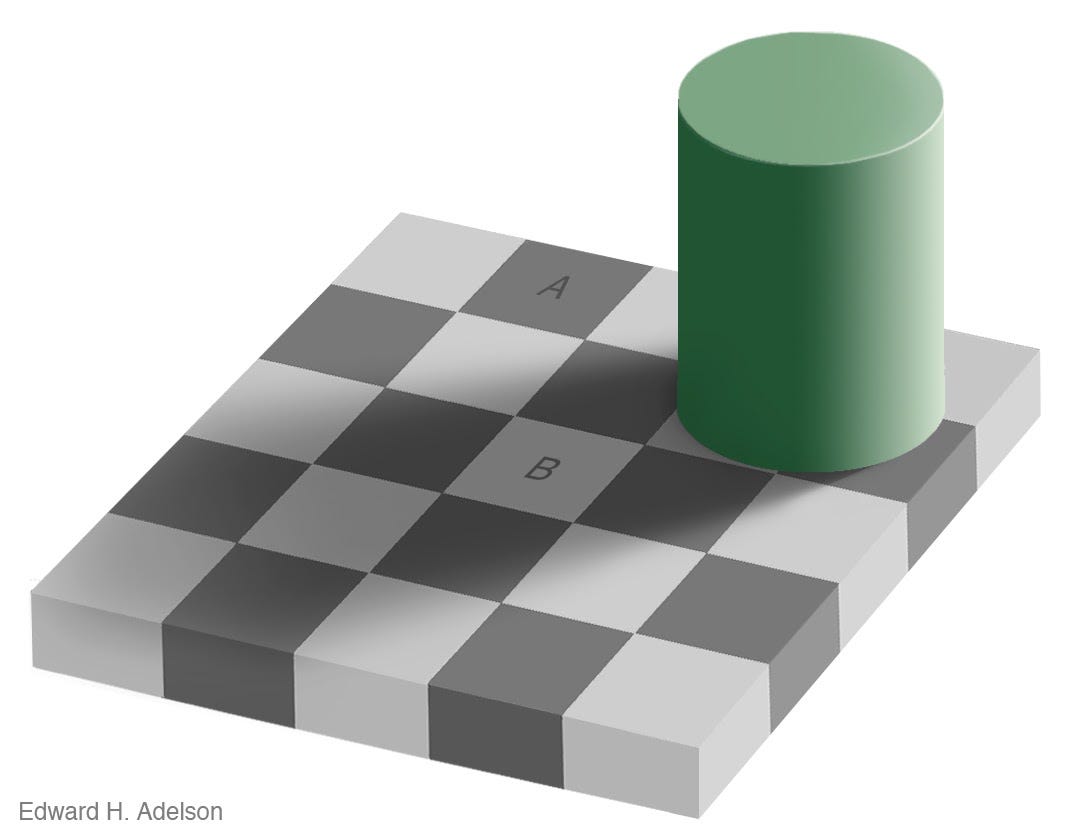
You brain knows immediately that square A is darker and square B is lighter. However, those two squares are actually the exact same color:
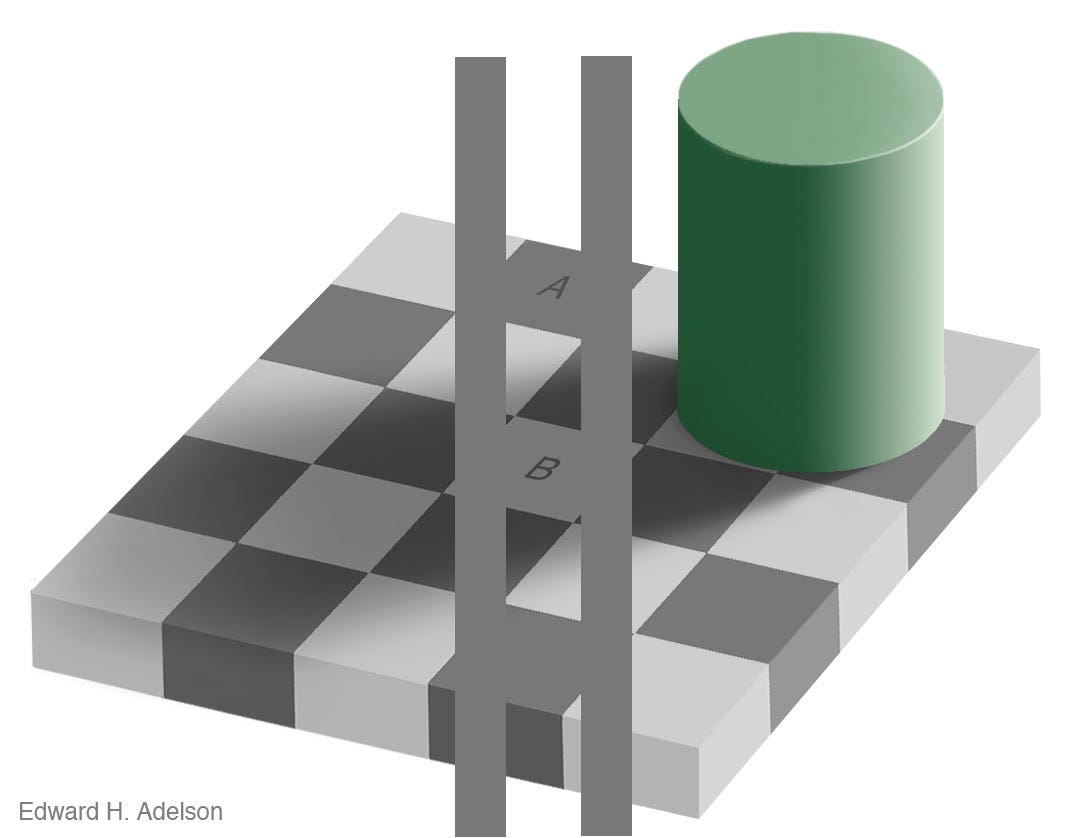
(I’ve just added two colored bars here to make it clear that the squares are the same color; nothing else about the image changed).
When you look at this image, you know about things like shadows and checkerboards, and so your brain automatically compensates for the shadow cast by the cylinder — so even though the actual pixels of the image are the same color, your brain knows that square A is a dark square, and square B is a light square with a shadow on it. But it’s not so easy to teach a computer about this.
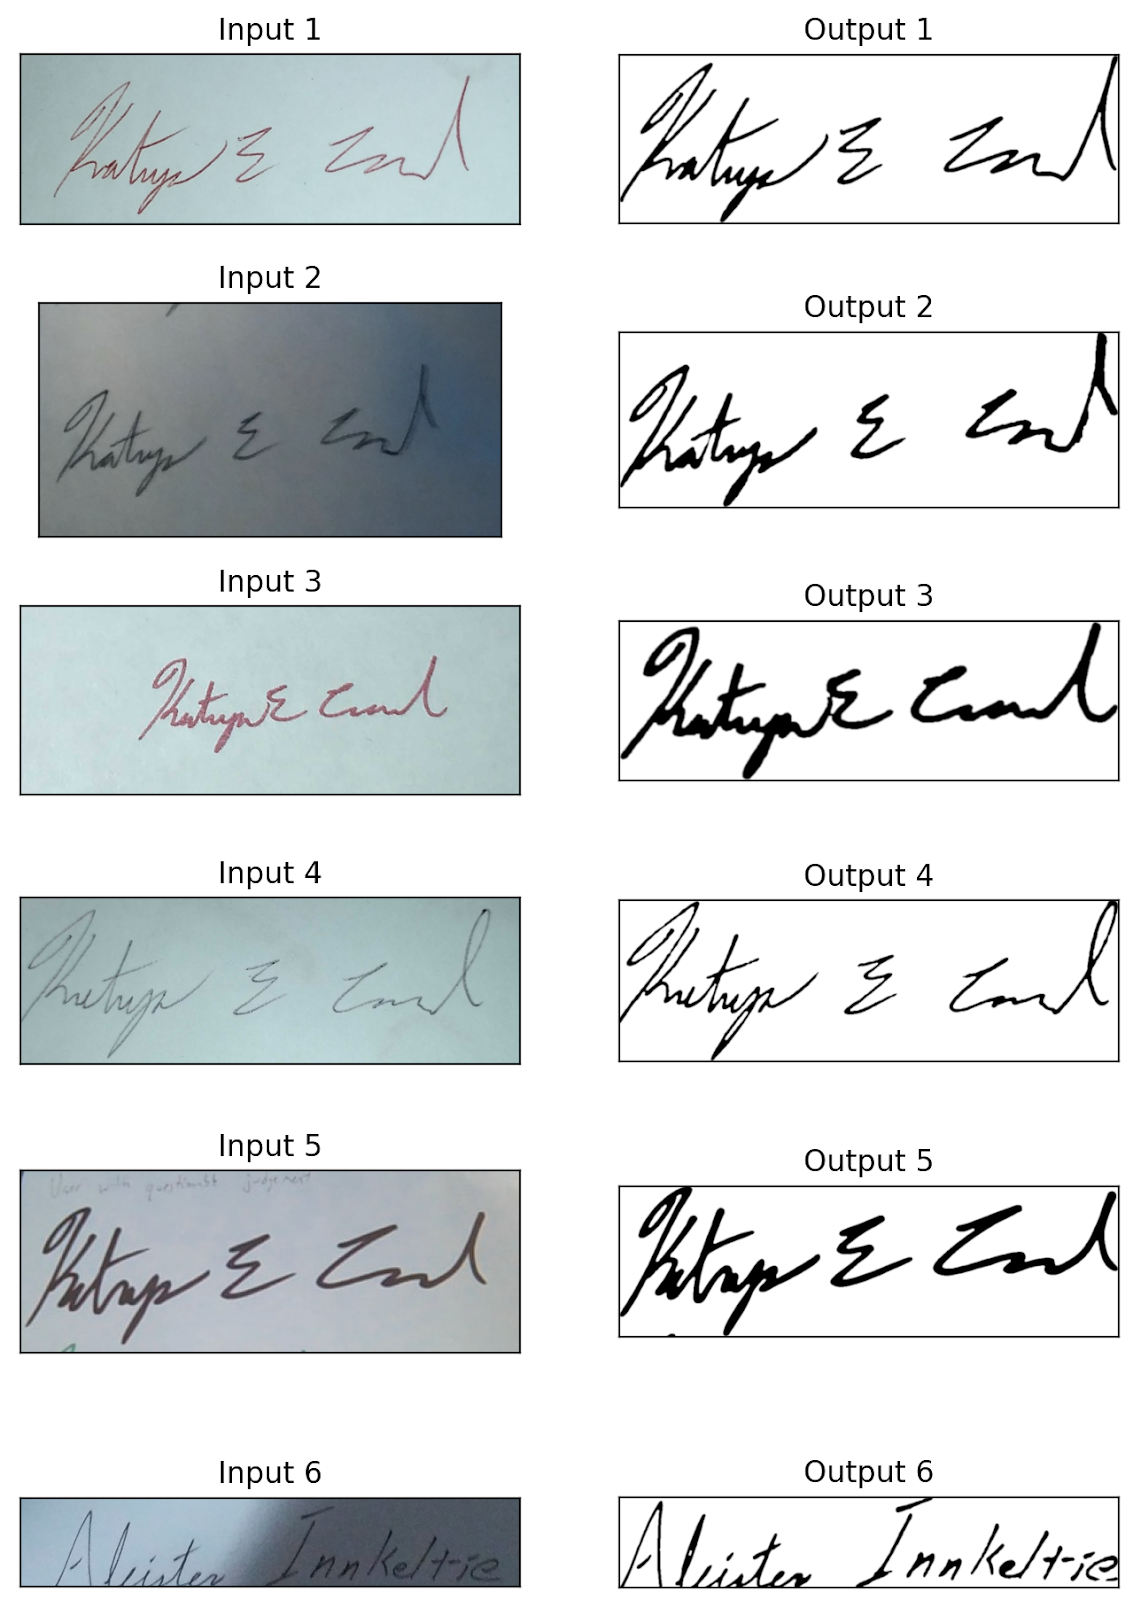
And this is pretty much the problem we’re trying to solve. When the user gives us a picture of their signature, we need to tell the difference between the dark parts of the image — the actual ink of the signature — and the parts that are just the paper, with stray marks or shadows.
There’s a couple of very simple techniques to do this that don’t work very well. The simplest is a basic threshold: we look at each pixel in the image, convert it to grayscale (just a shade of gray, with no color, like a black-and-white photograph), and then we see whether that pixel is closer to white, or closer to black. This works pretty well for really clear, simple images, but fails for lots of real-world cases like shadows and blurry images:
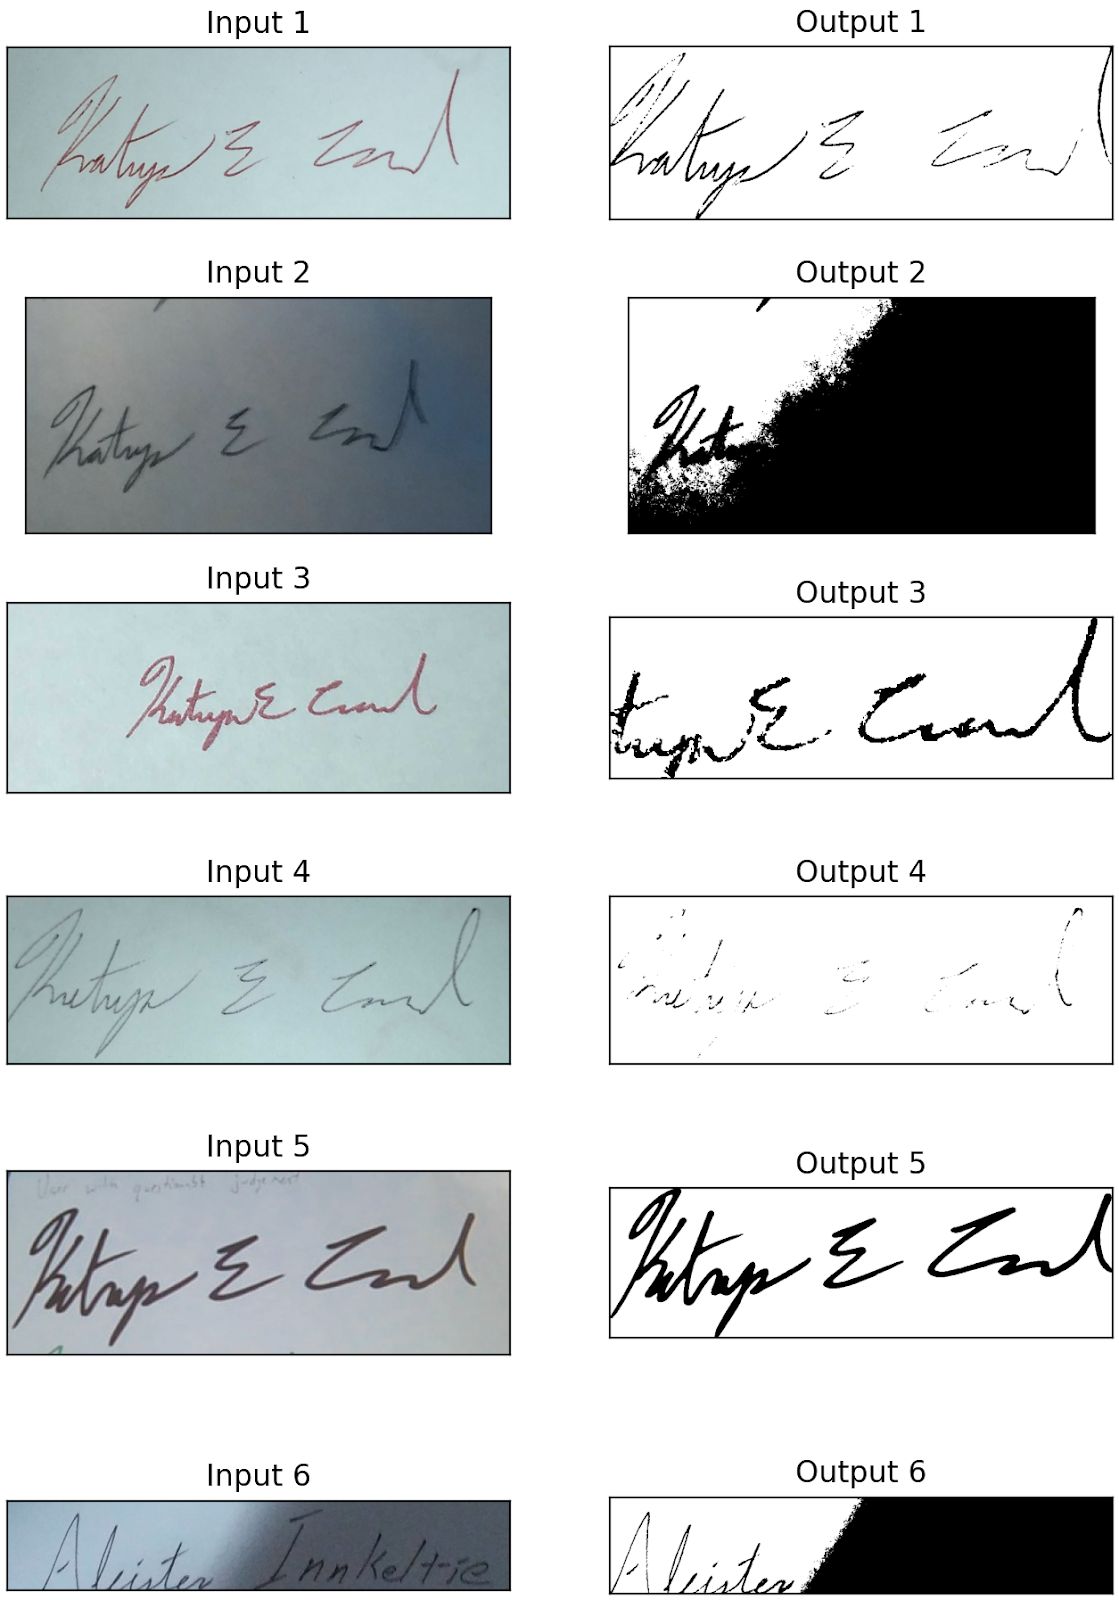
Another common technique that works a little better is Otsu Binarization. This technique works pretty similarly to the simple threshold: it looks at each grayscale pixel, and checks whether it’s closer to black or to white. But instead of dividing down the middle — more than 50% black ends up as black and less than 50% black ends up as white — it picks a smarter threshold based on the whole image to maximize how much detail is preserved. This works a bit better, but still not great:
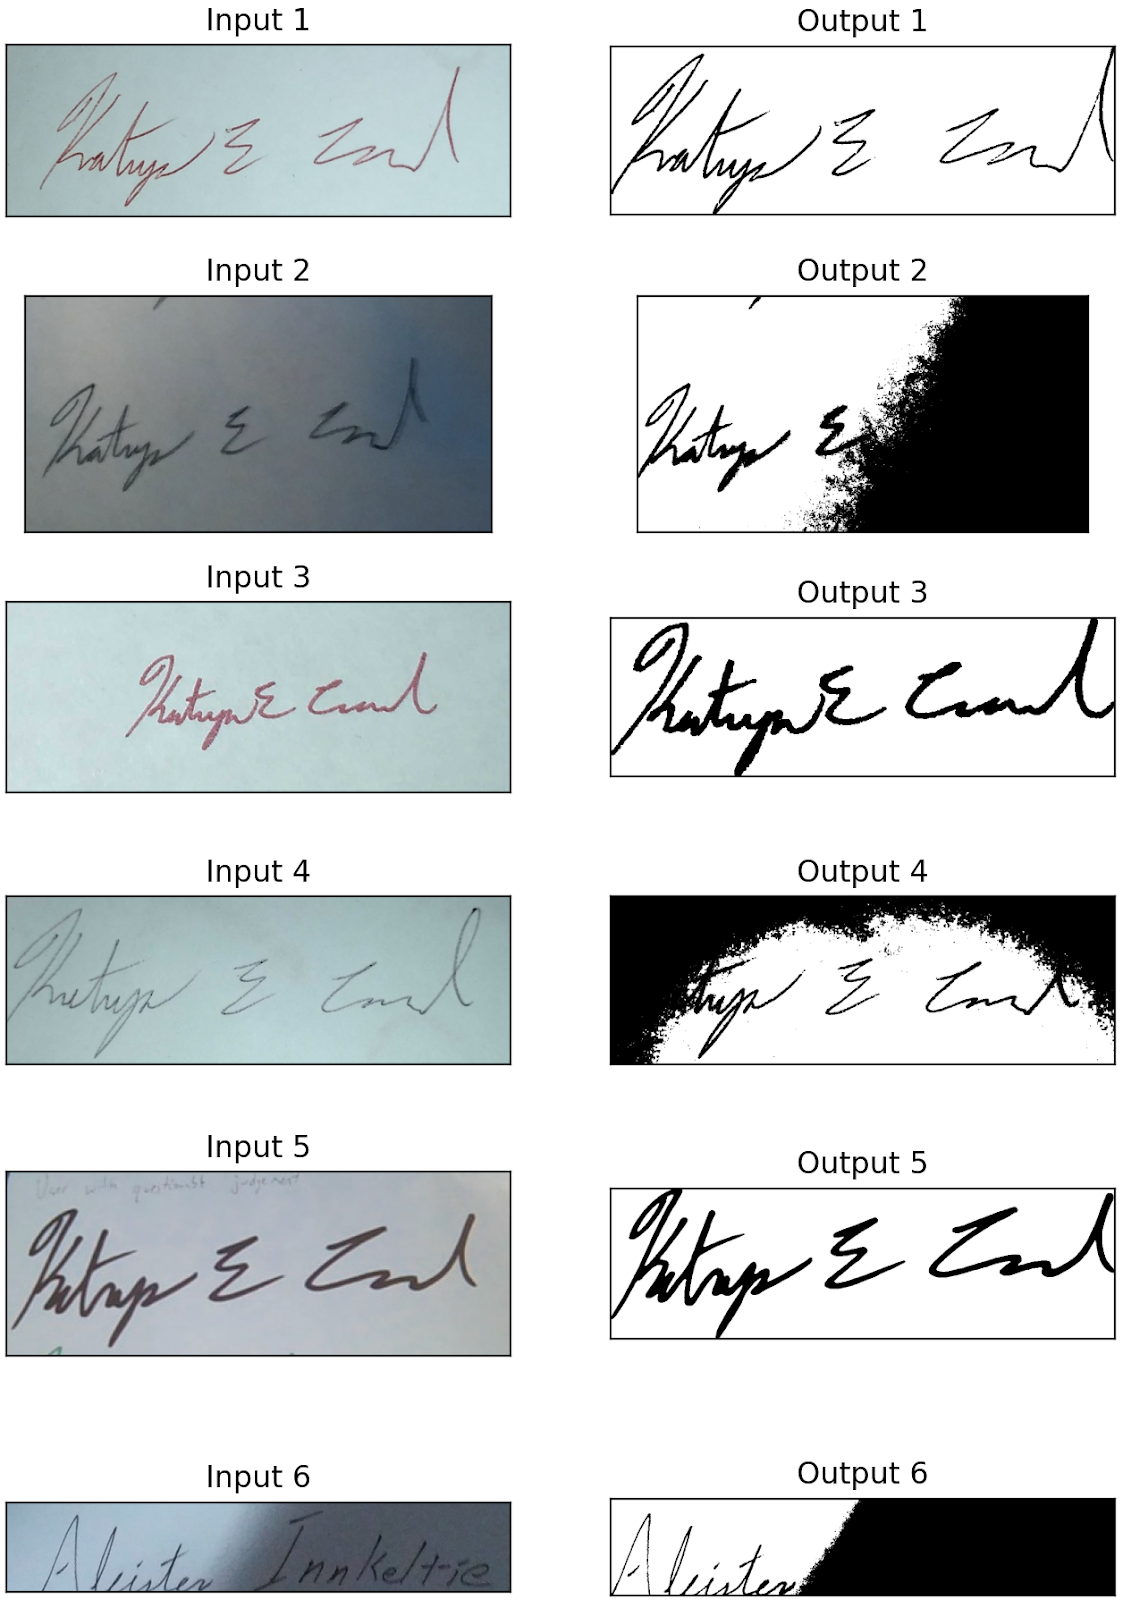
Our algorithm, on the other hand, uses a number of different techniques to achieve consistent results:

As you can see, this works in a wide variety of cases on lots of different input images.
Our algorithm
Our algorithm uses six steps, which I’ll go through in some detail:
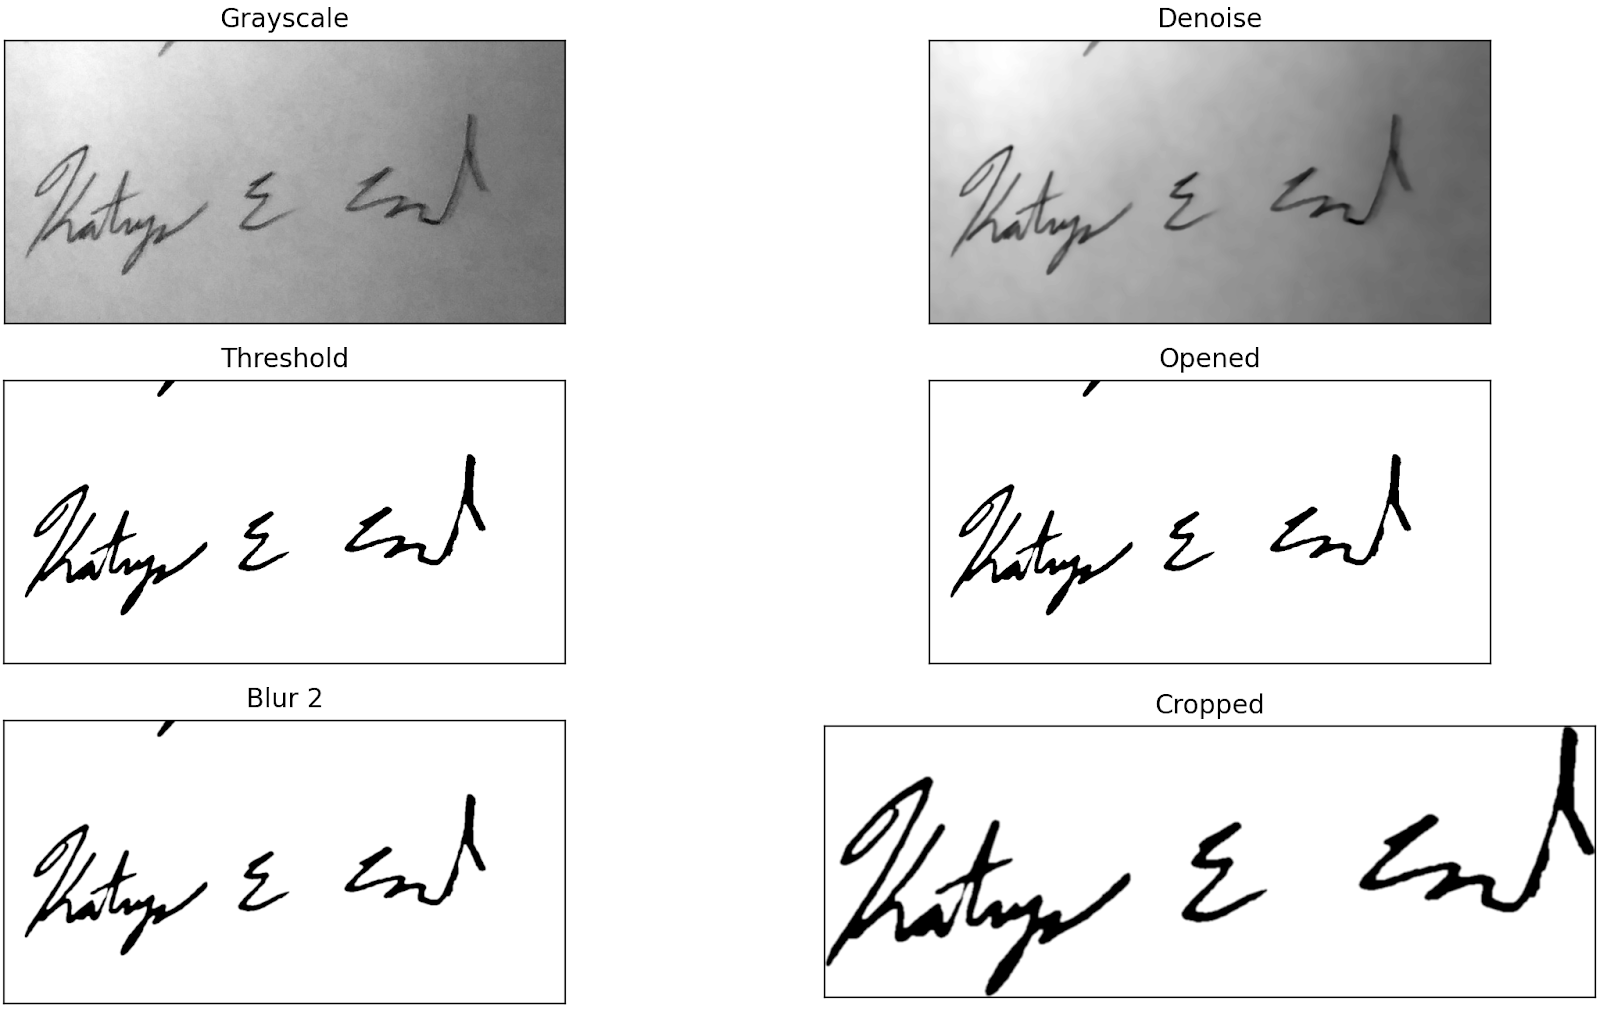
The six steps are:
- Grayscale: convert the image to grayscale
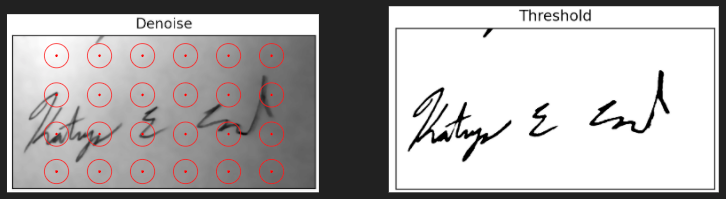
- Denoise: remove background noise with non-local means denoising
- Threshold: apply adaptive thresholding to convert the image to black-and-white
- Open: remove stray marks
- Blur: soften edges
- Crop: identify the core image and remove the rest
Step one: grayscale
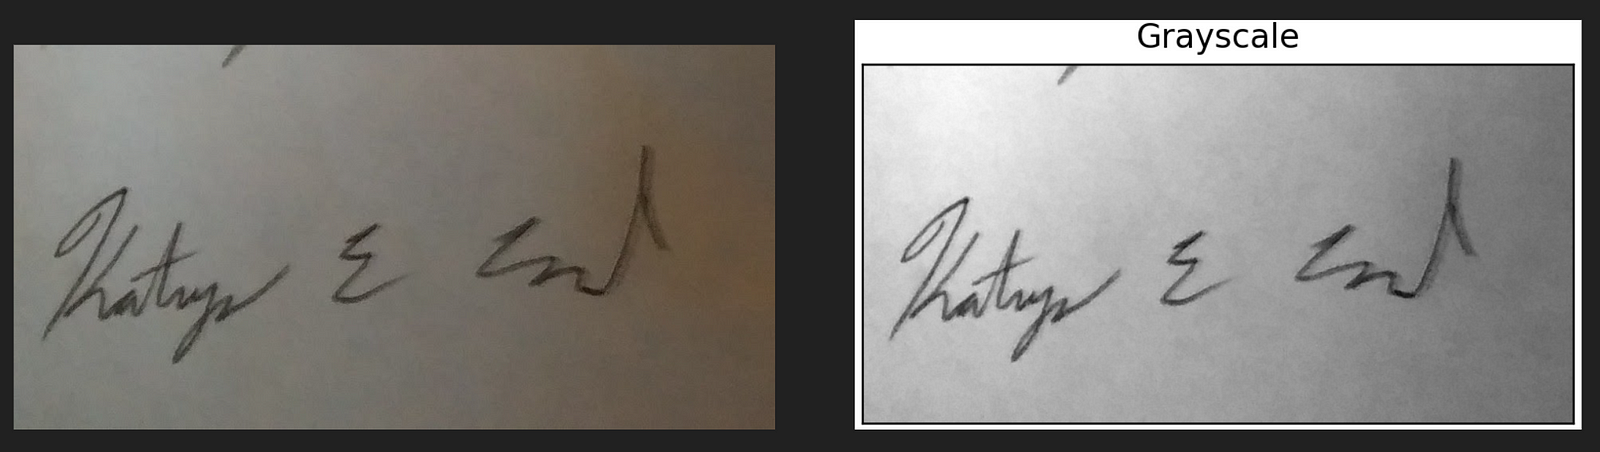
The grayscale step is pretty straightforward: we take each pixel, average the red, green, and blue components of that pixel, and then use that as the color of the pixel. This strips away all of the color information and makes every pixel a shade of gray.
This step simplifies everything that comes after: because we don’t care about the color information, discarding it gives us a much simpler input.
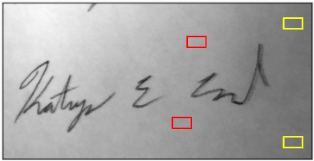
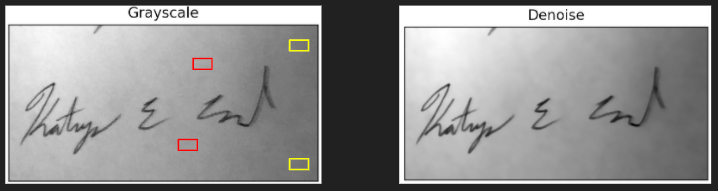
Step two: denoise
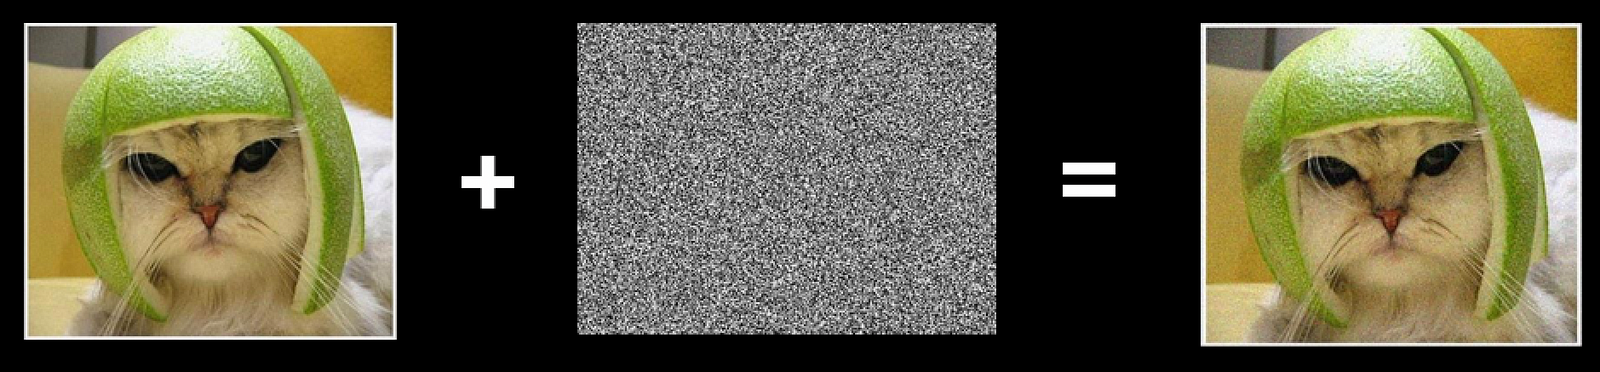
Now things start to get interesting. We want to remove background noise from the image — the random grey speckles that show up in digital images from cameras. This makes it easier for the rest of the algorithm to focus on the important parts of the image, rather than the random background noise.
Background noise is just a random variation in brightness and color that’s caused by the image sensor in a digital camera. It’s particularly noticeable in low-light photographs, which is pretty common when you’re taking a picture of your signature indoors — that’s part of the reason photographers use lots of lights when shooting professional photos. You can think of it as a random speckle pattern overlaid on top of the image:
If we have multiple copies of the source image, with different noise (for example, if we had multiple frames of a video — each frame showing the same thing, but with different noise patterns) we can take advantage of the fact that adding together noise gives us a consistent gray:

So if we add together multiple copies of the source image, each with different noise, the noise averages out and we get a de-noised image:
This works great! Except that in our case, we only have a single copy of the user’s signature. So we use a technique called non-local means denoising. With this technique, we find parts of the image that look similar, and then average those out to remove noise. So for example, the red and yellow boxes in this image:
And then by doing that over and over — finding lots of pieces of the image that look similar and averaging them out — we can de-noise the whole image:
Step 3: Adaptive thresholding
Adaptive thresholding is the meat of the algorithm: it’s what removes the background and converts the whole image to black-and-white. And it works much better than the simple thresholding and Otsu Binarization we talked about above, because of a key insight: we can’t apply the same threshold to the whole image.
Instead of trying to pick a threshold between black and white, and use that for the whole image, we instead pick a different threshold for each small part of the image, like this:
For each pixel, we look at an area around it to determine what qualifies as “light” or “dark” in that part of the image, and then use that local threshold to determine whether the pixel should be black or white in the output. This means that we’re not comparing the shadowy part on the right side of this image directly to the brighter part on the left side of the image.
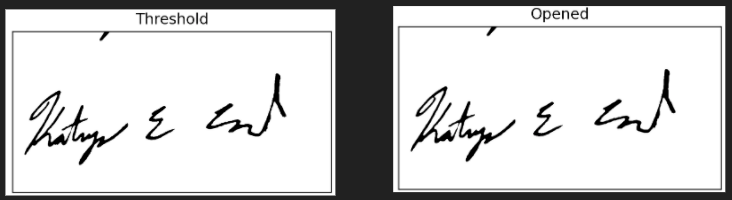
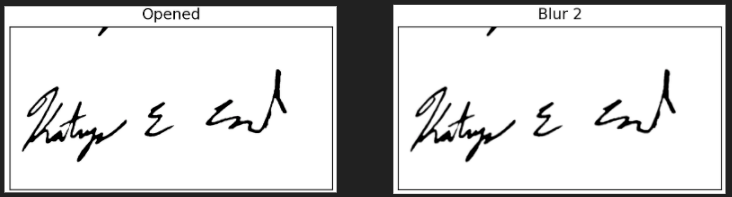
Step 4: Opening
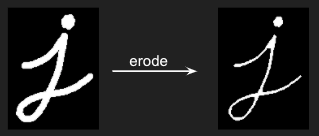
While this image has gone pretty smoothly so far — a nice, clean signature with no stray marks — sometimes a bit of dirt or a stray dot of ink still makes it through. So we use a technique called morphological transformation, which is a family of operations based on the shapes in an image. In particular we use a technique called opening, which is a combination of erosion and dilation.
Erosion takes an image and shrinks all the shapes in it:
And dilation does the opposite:
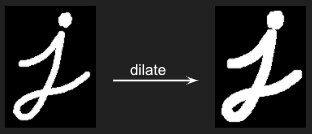
Doing one and then the other — eroding and then dilation — has a somewhat magical effect: most shapes are left the same (because the two operations cancel each other out), but small dots and marks are removed (because the erosion totally removes them, so there’s nothing left to dilate).

This combination of erosion and dilation is called opening, and it’s what we do to the processed signature images. It doesn’t have a big impact on this signature that we’re working with now, but as you can see from above, it helps to remove small marks in many cases.
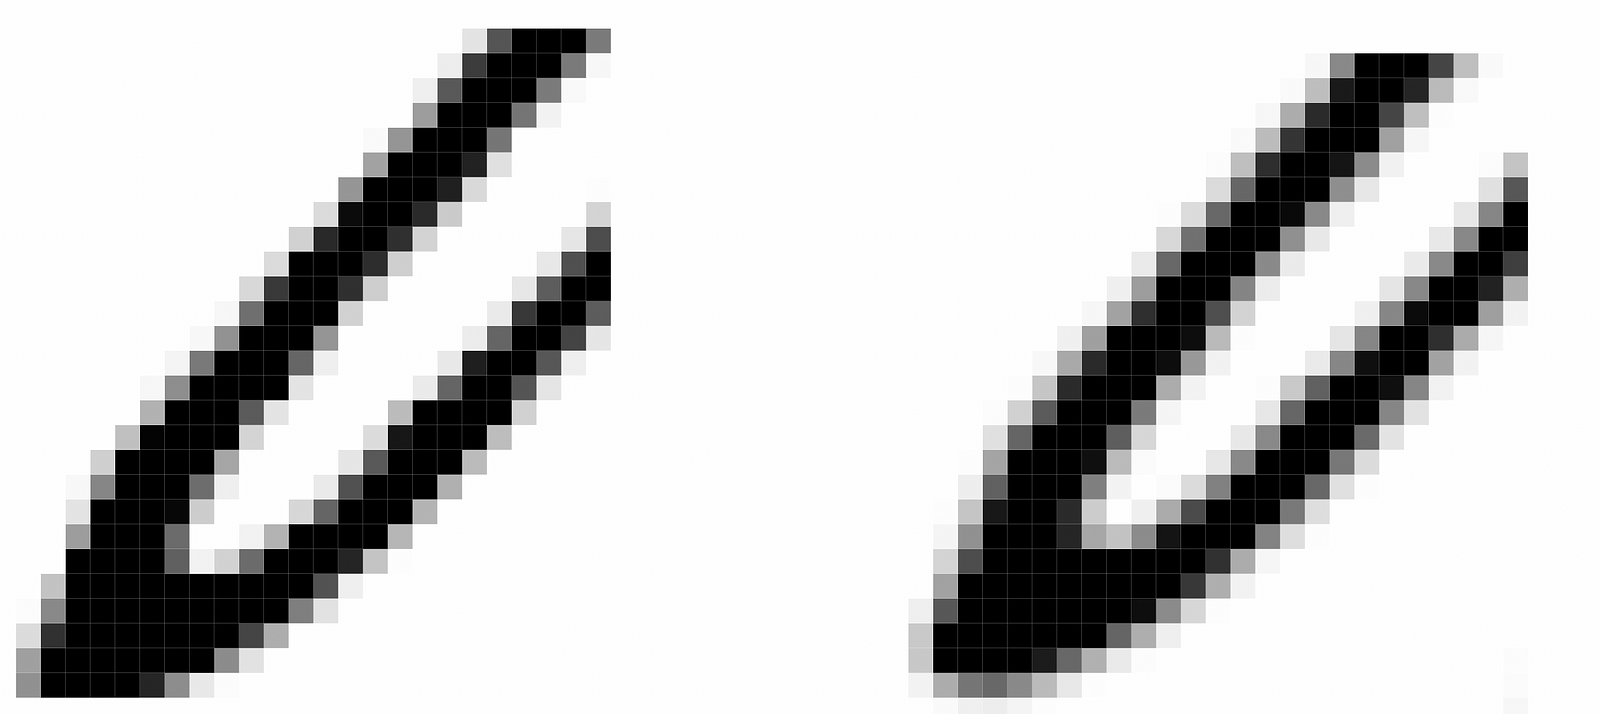
Step 5: Blur
One more quick step before we do our final cropping: we apply a slight blur to the image. This makes the image look a bit more natural — our adaptive thresholding converted the image to pure black-and-white with sharp edges, but physical writing doesn’t have such sharp edges. The ink bleeds a bit into the paper, giving softer lines. By applying a subtle blur, we make the image look a bit more natural and more legible. We use a gaussian blur, which means that for each pixel, we take a bit of the color of the pixels around it (weighting closer pixels more heavily), and use that as the new color of the pixel. So pixels right on the edge of black and white end up grey, because they take on some of the color of the pixels around them.
Here’s what that looks like zoomed in:
Step 6: Cropping
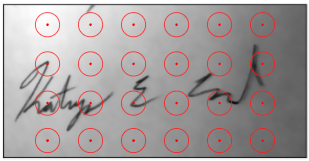
Our final step is to crop the image. This is actually really important: we’re going to be placing these signatures on PDFs, and those PDFs often don’t leave much space for the signature. So it’s important that we crop the image as tightly as possible, so we can use all of the available space for the signature, and not waste any space on empty background. We’ve asked the user to crop the image, but users mostly use that opportunity to remove other objects from the photo, rather than carefully cropping the image as tightly as possible.
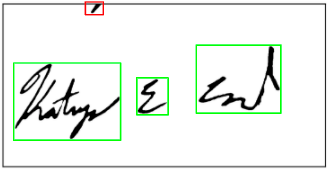
To crop the image, we first segment it into connected shapes. For each of these shapes, we apply a minimum threshold to determine whether it’s big enough to care about. In this example, we have 4 shapes, of which 3 are big enough to care about:
We then calculate the tightest possible crop that includes all of the large shapes, and use that:
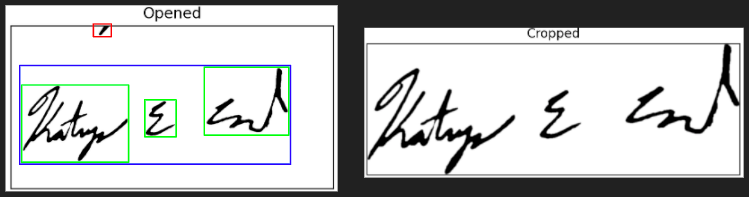
Note that we don’t actively remove the small shapes (the ones in red) — if they’re within the crop, they get to stay. This lets us remove stray marks around the edge of the image, without removing things like the dots on top of i’s or j’s.
Final result
And that’s it! A robust pipeline to extract signatures from a wide variety of user-captured images.
Wrap-Up And Learnings
This algorithm works well for a wide variety of signatures — and that part is really important to us. At VoteAmerica, we work to turn out underrepresented voters, and so we need to be really careful that our technology doesn’t unintentionally exclude certain kinds of voters.
Here’s an example of a signature we do pretty well at now, but some earlier versions of the algorithm didn’t do so well at.
Before we tuned it just right, the algorithm often removed the marks and dots that make this signature distinctive. We were overly reliant on the idea that a signature is one or two connected pieces, but that’s not true of a lot of people’s signatures.
In particular, a lot of younger people, and lower-income people who often don’t sign as many things, don’t have a smooth, simple signature. And so if our algorithm didn’t work well for those kinds of voters, we’d run the risk of a signature mismatch between the voter’s actual signature, and our electronic scan of that signature.
And so one of the key design constraints of our algorithm was that when it doesn’t work — like in this example, where it’s picked up the lines from the paper — it should be really clear to the voter why it didn’t work, so they can look at the result and try again.
We prototyped some versions that used more advanced machine learning systems to try and segment out what part of the image was a signature and what wasn’t, by training a model on a bunch of signatures. But the problem is that when that fails, it’s not obvious — it just picks the wrong part of the image. And that’s much harder for someone to understand and fix.
So even though we’ve built a system that’s much too complicated for most voters to understand, we’ve built a system where you can understand the output, and have an intuitive sense of what failed and how to fix it even if you don’t know how the underlying algorithm works.
Complex systems don’t always have to have complex results.
Check out the code
All of this code — for the algorithm itself, and the AWS Lambda deployment that we use to run it and handle things like receiving signature images via MMS — is available on our GitHub account at https://github.com/vote/signature_extractor.